 Hi all! My name is Joelle, owner and photographer of Joelle Marie Photography located in Rochester, NY. I’m a soon to be MRS! A mother to two amazing kids (three if you count my fiance) and two crazy pooches! I specialize in newborn, children and family portraits. I work FOR my clients and believe that the REALLY good portraits showcase a feeling to even complete strangers that when they see the photo they feel moved and feel the emotions the subject felt at that moment.
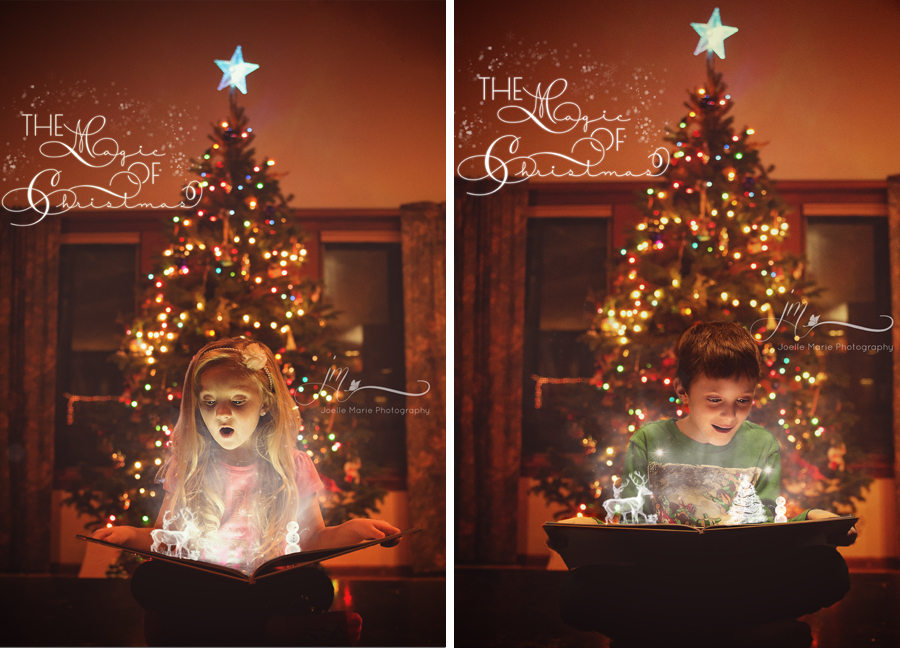
Today, I’m going to give you some tips on creating that perfect Christmas magic portrait! Christmas time is a beautiful time of year filled with wonder, magic and of course candy canes! For children the magic comes alive this time of year!!And for these pictures that’s exactly what I capture, that beautiful magic. So let’s jump right in!
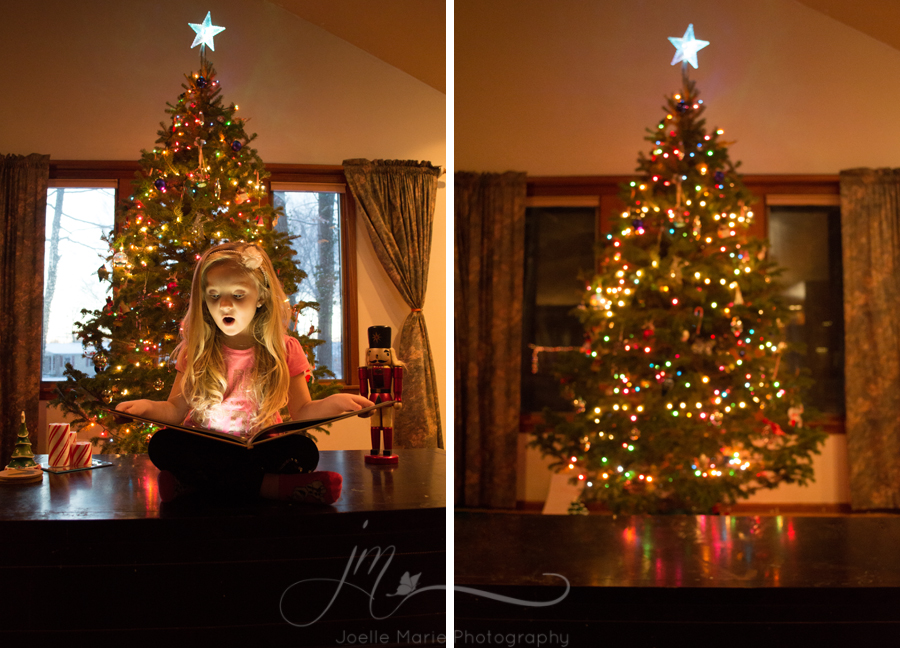
Subject: To get the photograph of my subject I place them in front of the tree, I do this because when it comes time to blend/feather the edges they already have a same background as the one they will be composited in front of (we will get to that more in a moment). I knew that for these photos I wanted them to have a “nighttime” feel so I took the photo on the left around 5pm (the settings used: f3.5 ISO200 1/15s), doing so would do two things for me.
First I am able to use the lights from my house to light her up and get that beautiful warm glow, second, the tone of her would match the tone of the Christmas tree background and blend more naturally as if she really belongs there (the less post process the better right?). Next I gave her a book to hold, I suggest for a young child to sit crisscross and place the book in their lap to ensure you are able to get the right angle. I have also found the bigger the book the easier for a child to hold.
The light source on her face is actually coming from my phone, I only turned the screen on. Turning the flashlight on or having a flash would be too harsh of light for what I wanted to achieve here. I pointed to the top middle of the page (about a few inches down) and told her to look here. Then to get the “surprised” look I simply asked her to show me her best surprised face (I did have to ask her to be a little less surprised) I adjusted her face a little to get the perfect angle (looking up too high would create shadows under her eyes, too low you wouldn’t see her face).
Tree: To achieve the picture on the right of the tree I waited until the sun set completely, turned some soft lights on in my house (settings for the tree: f 4 ISO 180 1/15s), put the tree out of focus to get that beautiful bokeh look and captured the photo of the Christmas tree.
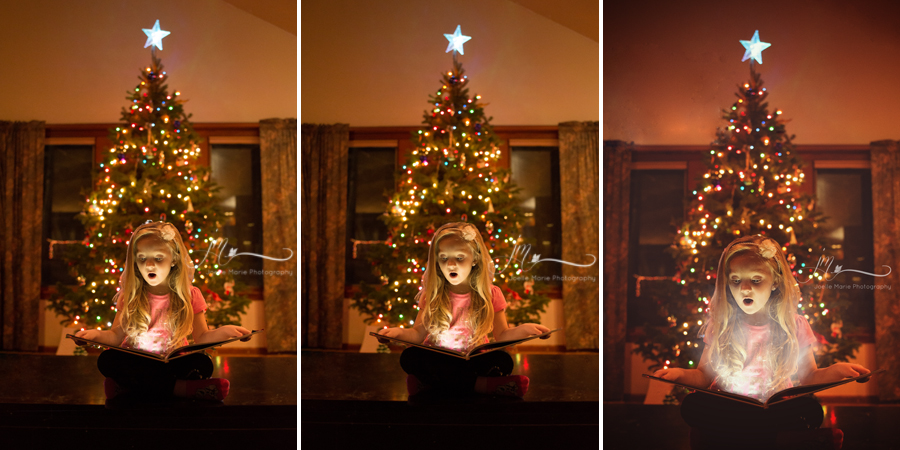
Blend to look natural: There are many ways to composite a photo, but I’m a big fan of the quick select tool in Photoshop (PS)! I took the photo of the subject used the quick select tool and selected her (you might have to select and unselect somethings to get your subject completely), then using the move tool I took the selection of her and dropped it into the tree photo.
As you can see from the photo on the left the subject stands out from the background like a sore thumb. Now comes the most important part (and the hardest) is blending your subject in with its background to make it look more naturally there. Again there are different ways to do this, but I achieved this by creating a new layer, using the healing brush and zooming in to blend the edges of my subject into the background. The image in the middle is blended and looks more natural. At this point you can edit it with whatever style most fits you, the image on the right I edited with a film and matte feel, cropped the bottom, did a few hand edits, and viola!

Overlays: Once you get the feeling you want for your photo, comes the fun part! Adding the overlays! There are so many overlays out there to choose from, some you can even find for free! For the “magical” light effect I used a Christmas magic lighting overlay and blended just enough to make the light look like it was coming out of the book, be sure to remove some lighting from the subjects face.
For the Christmas “character” overlay I used Magical Christmas overlays. I like them to look like they are really coming out and sitting on the book. I lined them up so that they were placed ON the pages NOT above (gives it a more real look), the bottoms of each character overlays I would place a little below the page line so I can layer mask to remove the bottoms of the overlays to give it that sitting on the book feel and lined at least one thing up with where their eyes were looking. Lastly, I added the Magical Christmas overlay and watermark and I’m done! I hope this helps you achieve the Magical Christmas portrait for you and your clients!
Find more of my work on the Web: Facebook / Instagram / Pinterest